John Deere Lawn Tractor Belt Replacement: A Step-by-Step DIY Guide
Is your John Deere lawn tractor struggling to cut the grass? A worn drive belt is a common culprit. Fortunately, replacing it is a manageable DIY project that can save you money. This guide provides clear, step-by-step instructions to help you tackle this maintenance task with confidence, regardless of your mechanical experience. We'll cover everything from identifying the correct replacement belt to troubleshooting common issues. Let's get started! For similar tractor belt replacements, check out this helpful guide: other tractor belts.
Tools and Parts You'll Need
Before you begin, gather these essential tools and parts:
- Socket wrench set: For loosening and tightening nuts and bolts.
- Wrenches: Various sizes, as needed (check your owner's manual).
- Screwdrivers: Phillips and flathead.
- Pliers: For gripping and adjusting components.
- Safety glasses: Essential for eye protection.
- Work gloves: To protect your hands.
- Replacement belt: Find the correct part number for your John Deere model in your owner's manual or on the John Deere website. Consider having an OEM (Original Equipment Manufacturer) belt on hand, or a high-quality aftermarket alternative.
Is it Really the Belt? Diagnosing the Problem
Before diving into replacement, confirm the belt is the problem. Look for visible signs of wear such as cracks, fraying, or a glazed (shiny) appearance. A worn belt might cause the mower deck to not engage or the blades to spin inconsistently. Ignoring a worn belt can lead to more significant damage, so regular pre-season inspections are recommended.
Locating the Correct Replacement Belt: Part Numbers and Sources
Your John Deere owner's manual is your primary resource for the correct part number. This will ensure a proper fit. You can also use this part number to find the belt online from reputable parts suppliers or at a John Deere dealership. Using the correct part number is crucial to avoid compatibility issues and ensure optimal performance.
Step-by-Step Belt Replacement Guide
Remember: Different John Deere models may have slightly different procedures. Always consult your owner's manual for model-specific instructions. This is a general guide and might need adjustments based on your tractor's specific design.
Safety First: Disconnect the spark plug wire to prevent accidental starting. This is critical for your safety.
Mower Deck Removal: Remove the mower deck according to your owner's manual instructions. This often involves removing bolts or pins. Take photos or make notes if needed.
Loosening the Belt Tensioner: Locate the belt tensioner mechanism (often spring-loaded). Use the appropriate wrench to carefully loosen the tensioner, creating enough slack to remove the old belt.
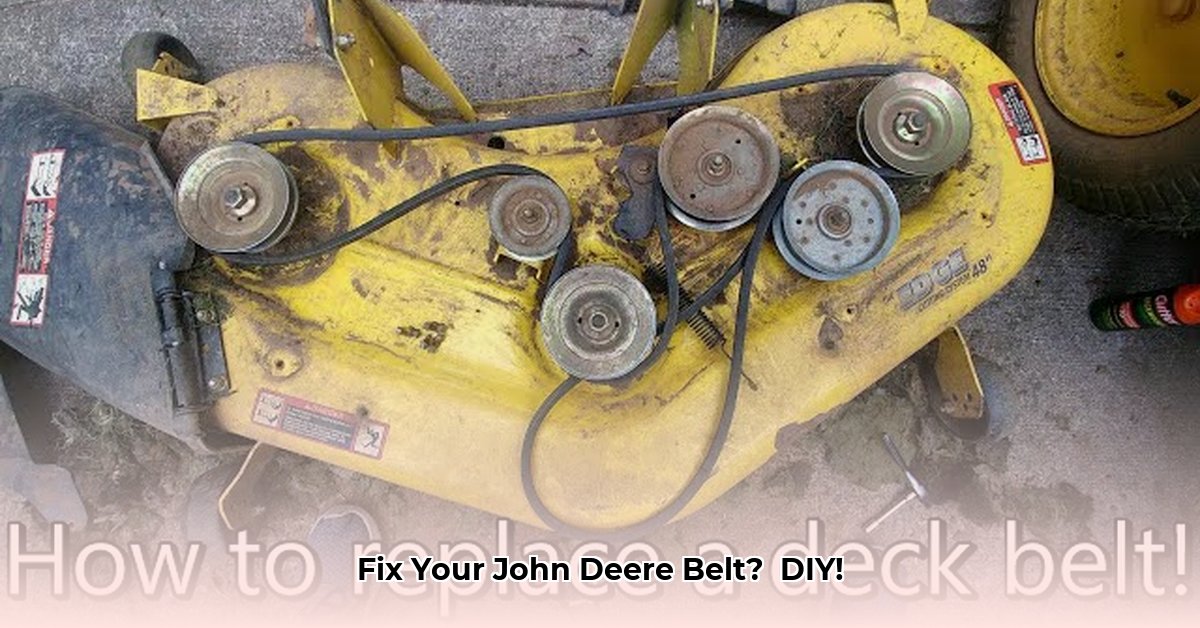
Removing the Old Belt: Carefully remove the old belt, paying close attention to its routing around the pulleys. Take photos or draw a diagram to guide you during reinstallation.
Installing the New Belt: Carefully install the new belt, following the same path as the old one. Ensure it sits correctly in all the pulleys. Double-check your work before proceeding.
Adjusting Belt Tension: Re-engage the belt tensioner. Proper tension is crucial to avoid slippage. Your owner's manual will guide you to the correct tension. Too tight can damage the belt, while too loose can cause slippage.
Reattaching the Mower Deck: Reinstall the mower deck, securing all bolts and pins.
Testing and Functionality Check: Reconnect the spark plug wire. Start the engine and let the tractor run briefly. Listen for unusual noises and check the smooth operation of the blades.
Troubleshooting Common Belt Replacement Issues
Even with careful attention, problems can occur. Here's how to address some common issues:
Belt Slipping: The belt tension might need adjustment. Refer to your owner's manual for the proper tension settings. A severely worn belt also requires replacement.
Belt Breaking: This suggests a more serious problem, potentially involving damaged pulleys or other mechanical issues. Consult a professional mechanic if this occurs.
Belt squealing: This could indicate misalignment, insufficient lubrication, or excess wear. Check pulley alignment and consider lubricating moving parts per your owner's manual.
Preventative Maintenance: Extending Belt Lifespan
Regularly inspect your belt before each mowing season. Look for wear and tear, cracks, or frays. Keep your mower deck clean to prevent excessive debris buildup that can accelerate wear and damage. Proactive maintenance significantly extends the lifespan of your belt and your John Deere lawn tractor.
Where to Find Replacement Belts: Part Numbers and Sources
Finding the right belt is key. Your John Deere owner's manual has the correct OEM part number. Online retailers and John Deere dealers are great sources for both OEM and high-quality aftermarket replacements. Always verify compatibility before purchasing.
Remember, consulting your John Deere owner's manual is crucial for model-specific instructions. Happy mowing!